Home        About        Kelly's Favorites        Videos        Contact        Legal Disclaimer

Showing posts with label Sally Hansen. Show all posts

Tuesday, June 2, 2015

Mani Monday: Memorial Day Mani

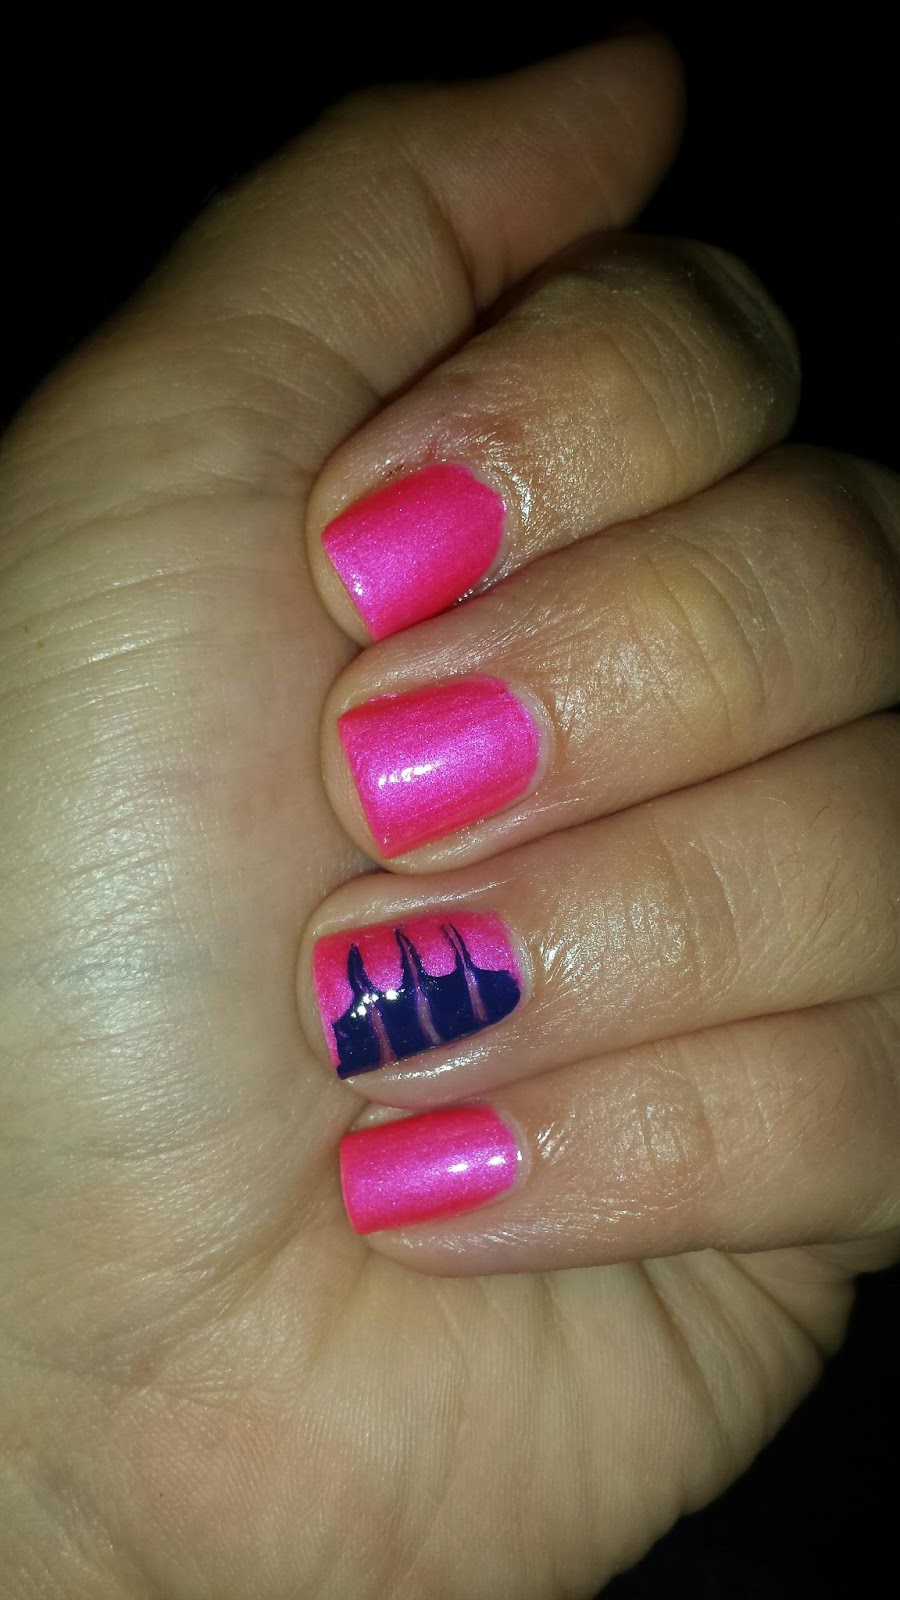
It is Mani Monday and today I am doing a Memorial Day Mani! For this manicure I used used four colors and a toothpick. I used Sinful Colors Ruby Ruby, Hot Spot, Snow Me White, and Star Blast Off. Ruby Ruby and Snow Me White are both a creme finish. Hot Spot is a shimmer finish and Star Blast Off is a chunky glitter. Today happens to be Memorial Day, so I decided to go with a patriotic theme this week!

Step 1: Apply a base coat. I used Sally Hansen Hard As Nails Strengthener.

Step 2: Apply a base color. I used Sinful Colors Snow Me White. In general, I hate using a plain white nail polish, they are always streaky no matter the brand and you almost always need three coats, which means a lot of polish.

Step 3: Apply your red nail polish down one side of the nail. Before it dries, apply the blue nail polish down the center of the nail, slightly overlapping the red polish. I used Sinful Colors Ruby Ruby for the red and Sinful Colors Hot Spot for the blue. Starting at the red polish, drag a toothpick from one side of the nail right though the blue and white to the other side of the nail. For this step, I would work one nail at a time, as you want to polish to be wet.

Step 5: You can do this to every nail, if you like, but I chose to just apply the glitter polish to my ring finger for an accent. This one takes patience. The glitter I used was Sinful Colors Star Blast Off. It is a glitter that has white starts and chunky red, white, and blue glitter in it. It took a few dips into the bottle to get a white star to stick to the brush. I wanted two stars on each ring finger. Once I got the stars I dipped the brush back in the bottle and applied a thin coat to each ring finger to get some of the red, white, and blue glitters on the nail.

Step 6: Apply a fast drying top coat. I used Sally Hansen Insta-dri top coat for this. After this clean up the cuticle and around the nail with a nail polish remover or acetone. Let the polish dry and finish off the manicure by applying a cuticle oil to the cuticle to moisturize.

Memorial Day Mani
This manicure does take a little bit of time and some patience. Happy painting and Happy Memorial Day everyone! Please have a safe and happy holiday and take a minute to remember all of the fallen hero's that fought for our freedom. Freedom isn't free! Say a prayer for all of the brave men and women who died fighting for our country and say a prayer for their families too.


**This manicure was done last week. I finally had time to finish writing this blog and share it with everyone! Sorry for the delay. I think I am almost all caught up.

Mani Monday: Easy Nail Art With A Toothpick

It's Mani Monday and here is an easy nail art manicure using a toothpick! I am loving Mani Monday, it definitely makes Mondays more bearable! This is an easy manicure and the only thing you need is two nail polish colors and a toothpick. I saw a video on YouTube quite some time ago by Cutepolish, using this technique. However, she used three colors and I am only using two. Check out her tutorial here! The colors I am using are Sinful Colors Daredevil and Sinful Colors Navy I Do. Both have a creme finish according to the Sinful Colors website, however, Daredevil does have a slight shimmer to it. I think these colors work perfectly together, but you can use any two colors you like.

Step 1: Apply a base coat. I used Sally Hansen Hard As Nails Strengthener.

Step 2: Apply a base color. I used Sinful Colors Daredevil.

Step 3: Pick another polish color and paint a stripe of it down one side of your nail. Then while it is still wet, drag a toothpick through the stripe of color and base color and stop just before reaching the other side of the nail. I used Sinful Colors Navy I Do for this step. I chose to only do an accent nail, but you can do all of your nails like this and it would look super cute! I would recommend working one nail at a time with the second color and toothpick though, as you don't want this color to dry before dragging the toothpick through it.

Step 4: Apply a fast drying top coat. I used Sally Hansen Insta-dri top coat. Then clean up the cuticles with acetone or nail polish remover, if necessary. Let the polish dry completely and then finish up the manicure by using a cuticle oil of your liking to moisturize the cuticle and around the nail. 


Toothpick Manicure using Sinful Colors Daredevil and Navy I Do.

There you have it! An easy manicure; and all you needed was a toothpick! Happy Monday and happy painting everyone!

**This manicure is from a few weeks ago. I finally had time to finish writing the blog and post it! Sorry for the delay!

Mani Monday: Swirls

It is Mani Monday with pretty swirls! I used three colors in this manicure. The base color is Sinful Colors Easy Going. This a very very light pink. It has a creme finish and is opaque in two coats. For the swirls and nail tips, I used Sinful Colors Navy I Do. This is also a creme finish, true navy color. It is a limited edition color from the Spring 2015 Collection. Over the Navy I Do, I used Sally Hansen Hard As Nails Ice Queen, a silver glitter with chunky blue glitters mixed in. I just wanted this manicure to have a little sparkle and Ice Queen was the perfect thing! Ok so onto the manicure!

Step 1: Apply a base coat. As usual, I used Sally Hansen Hard As Nail Strengthener for that.

Step 2: Apply a base color. You can use any color you like for this. I used Sinful Colors Easy Going.

Sinful Colors Easy Going
Step 3: Pick out the right nail art brush. The one I used was a little big, I didn't realize until after I started, but I was already committed and if I am being honest, I was just too lazy to start over! 

Step 4: Pick out a color that complements the base color. I used Sinful Colors Navy I do. Decide which nails you want to have a french tip on and which nails you want to have swirls on. I decided to put swirls on my middle and ring fingers. If painting a french tip is hard for you, like it is for me, I find the easiest way to do it is to hold the brush steady at the tip of the nail and rotate the finger in the opposite direction. So, if you are working on the right hand, you would hold the brush steady at the tip of the nail and starting at the the left side of the nail you rotate your finger until the brush reaches the right side of the nail. You would reverse this for the left hand. The swirls you just free hand and anything goes with those. I find it best to use small strokes with the brush for the swirls. 
Sinful Colors Navy I Do for Swirls and French Tip
Step 5: This step is optional. I wanted a little sparkle in this manicure. For the sparkle, I used Sally Hansen Hard As Nails Ice Queen. I just applied it over the Navy I Do for a little pop.

Sally Hansen Ice Queen over Navy I Do
Step 6: Apply a fast drying top coat to seal the polish for a long lasting manicure! As always, I used Sally Hansen Insta-dri top coat. After you apply the top coat clean up the cuticles, if necessary. I do this using acetone. I find it works better than regular nail polish remover. Just keep in mind that acetone is extremely drying! So I always use a cuticle oil after I am done painting my nails and cleaning up the edges. I like Sally Hansen's Vitamin E Cuticle Oil. I like this because it has the vitamin E in it, however, if you have coconut oil handy, it is a million times better! I tend to switch between the two. Once I finish this Sally Hansen cuticle oil, I will stick to coconut oil only.  

Finished Manicure
Well there you have it! A really pretty manicure. This one does take some time and patience, but the end result is worth it! Happy Monday and happy painting!

**I did this manicure about a month ago, and haven't had time to finish writing the blog post about it until now! Sorry for the delay everyone!

Wednesday, April 8, 2015

Painting On The Go

Sally Hansen Ice Queen
Sinful Colors Endless Blue
My best friend Julia, from Enchanted Fantasy here on blogger, came to visit me at my second job last night, and she decided to do a little painting on the go. So while I was pouring drinks, she sat and painted her nails. I loved the color she was using so much, that I needed to share it with all of you! And surprisingly, it isn't a color I have in my collection. She used Sinful Colors Endless Blue. It is a beautiful cobalt blue shade, that I am now going to go out and buy so I can have it in my collection too! And on her ring finger she added Sally Hansen Hard As Nails Ice Queen as an accent. The Sally Hansen is one she borrowed from me! And it is one I don't reach for enough! I definitely love how it pairs with Endless Blue!

Finished Manicure

I hope everyone is having a fabulous Wednesday and happy painting!

Saturday, April 4, 2015

Easter Nails

It is Easter, and that means Easter Nails! I always like to do something fun on my nails for a holiday! Eh who am I kidding? I love to do something fun on my nails anytime lol! So while I was deciding on what to do, I remembered seeing this tutorial on YouTube by My Simple Little Pleasures for a Green Mosaic French Tip design. If you are a lover of water marble designs, you definitely need to check out her videos! I have yet to master this technique, but she always manages to make it look so easy and so amazing every time! Every once in a while she throws in something else, like her Green Mosaic French Tip Tutorial, which inspired my Easter design this year. Keep in mind this is inspired, not identical. I was going for a triangular mosaic look, that kind of reminds me of an egg shell. If you would like to try this look keep reading to find out how I did it! It is a little time consuming, but super easy, and you don't need any fancy nail tools, just some tape and some time to kill!

1. Start by applying a base coat. This will help prevent the nail polish from staining your nails. I like to use Sally Hansen Hard as Nails Strengthener, but you can use any base coat of your choosing.

Base Coat
2. Apply your base color. For this I used Sally Hansen Xtreme Wear in Gunmetal. I chose Gunmetal because I knew I wanted a dark gray base, but I liked that this one has a shimmer to it! The colors I used on top of it all have a sort of satin or glossy finish, so I wanted a little sparkle for the base! It very important to make sure that whatever base color you use dries completely before moving onto the next steps, otherwise you are going to tear up that base color! Whenever I need to do that, I usually apply the base color the night before and then finish the design the next day.

Sally Hansen Xtreme Wear Gunmetal

3. Cut your tape into strips, any thickness you want. Just remember to keep them narrow enough to fit your nail, since everyone has a different size nail bed and different length nail. Cut them to fit your nail. They won't be even, but that is ok. That is one of the great things about this type of design, no two nails will be exactly the same!

Cut the Tape

4. Apply the tape for the design you want to create. I used three pieces on each nail. I applied each piece on a diagonal to form a zigzag. The biggest tip I have for this, do one hand at a time. If you try to the apply tape to both hands, it can be difficult painting your nails. Also, trying to apply tape to the other hand isn't always easy when you have tape already on one set of nails.

Create your Design

5. Apply your colors or color, depending on what look you are going for. Apply the color to the areas that aren't covered by the tape. And for this, I would work one nail at a time because you don't want the nail polish to dry before pulling off the tape. While the polish is still wet, remove the tape. This will ensure that the tape doesn't pull off any your design with it! Applying the colors can be a little messy, but no worries. It's nothing a little nail polish remover or acetone and a q-tip can't clean up! For my design, I wanted to go for a monochromatic ombre look with purples. The color closest to my cuticle is Sinful Colors Mauve, the next one up is Sally Hansen Xtreme Wear Lacey Lilac, the next one up is Sinful Colors Rose Dust, and the tip color is Sally Hansen Insta-Dry Lively Lilac.

Apply the color

6. Let those colors dry a little bit before applying a top coat. If you don't then the colors might streak a little on you as you brush on the top coat. This is when I like to clean up any colors on my cuticles or around my nail beds. It doesn't take very long, but it is usually enough time to let the design dry a little bit.

Clean Up with an Acetone

7. Apply a top coat to lock in the design and give you a manicure that will last all week, depending on how hard you are on your nails that is. I wear gloves at work and wash my hands a lot because of what I do, so mine usually last for 4-5 days. I like to use a fast drying top coat. I have been loving Sally Hansen Insta-Dry Top Coat. Works like a charm every time!

Top Coat

And voila!! Finished!


Mosaic Ombre Manicure

If you like this look or recreate it, I would love to see your designs! You can share them on my Facebook page or in the comments below! Happy Nail Designing!

Tuesday, January 8, 2013

Nail Polish Obsession Tag!!

The nail polish obsession tag is one that's been going around on YouTube for a while now, but since I don't film videos, I figured I could do the tag this way! And well let's face it, it's kind of the perfect tag for me to do!

Question 1: What's your favorite nail polish company?
Hands down Sinful Colors!

 Question 2: Glitter or no glitter?
Always glitter!! My favorite glitter polish at the moment is Sally Hansen Xtreme Wear in Strobe Light.

Strobe Light
Question 3: OPI, China Glaze, or Essie?
Well, I suppose OPI, since that tends to be the brand that I pick when I actually go to get my nails done professionally. However, I don't actually own any shades by those brands.

Question 4: When do you change your nail polish?
This really depends. If I am in a nail polish craze, I will change it up to three times a week and there have been times that I've changed it daily. More often than not it's usually once a week.

Question 5: What's your favorite color on you nails?
Well I love any color, but if I had to pick, I think it would be Sally Hansen Xtreme Wear in Purple Potion or Sinful Colors Dream On.

Purple Potion

Dream On
Question 6: Darks or Brights?
I will wear either, it really just depends on my mood! I think my favorite dark would have to be Sinful Colors Rich in Heart or Sinful Colors Rain Storm and my favorite bright is a 4 way tie between Sinful Colors Dream On, Sinful Colors Love Nails, Sally Hansen Xtreme Wear in Going Green, and Sally Hansen Insta Dry in Sonic Bloom!

Rich In Heart
Rain Storm
Love Nails
Going Green
Sonic Bloom
 Question 7: What are you wearing on your nails right this moment?
Sinful Colors in Beau Khaki!

Beau Khaki
 Question 8: Matte Nails: In or Out?
Well, I really don't like a matte finish, so for me it's an out, but it is definitely a personal preference.

Question 9: French Manicure?
Once in a while, but I definitely prefer a solid color!

Question 10: Favorite winter color?
Well, I don't stick to winter color, spring color, summer color, fall color rules. I honestly just wear whatever I'm in the mood to wear! And it varies from week to week. Sometimes I want a bright color and sometimes I want a dark color, it really just depends on my mood. So I honestly can't pick a favorite for the season. 

I hope you enjoyed reading this tag and if you want to fill in your own answers to the questions, then I tag everyone! You can respond in the comments, my Facebook page http://www.facebook.com/KellysBeautifulDisaster?ref=hl , or my twitter @KellyO1982. You can also write a blog post or do a YouTube video and link it in the comments below!

Here are all the questions!
1. What's your favorite nail polish company?
2. Glitter or no glitter?
3. OPI, China Glaze, or Essie?
4. When do you change your nail polish?
5. What's your favorite color on your nails?
6. Darks or Brights?
7. What are you wearing on your nails right this moment?
8. Matte Nails--In or Out?
9. French Manicure?
10. Favorite Winter Color?

Monday, January 7, 2013

Cuticle Care

Good cuticle Care is so important for your nails! So question? Are your cuticles as troublesome as mine can be? Sometimes I swear it doesn't matter how well I take care of my nails, my cuticles hate me! I started using Sally Hansen Instant Cuticle Remover a while back, whenever I give myself a full manicure. I find that it works really well to help soften my cuticles. It is really easy to use. All you have to do is squeeze it on to your cuticles and let it sit for about 15-20 seconds and then just use a cuticle pusher or an orange stick to gently push your cuticles back off of the nail bed. Make sure you don't leave this stuff on for longer than a minute, otherwise it might be irritating to your skin. Wash your hands as soon as you are done pushing your cuticles back to get off any excess remover. 
 
Cuticle Remover
  
While I find that this product works really well, it's definitely not a permanent solution, because my cuticles do not stay soft for long. In combination with that I use Sally Hansen Vitamin E Nail and Cuticle Oil. I don't use it religiously, but when I do, it works! Vitamin E is loaded with antioxidants that actually help repair and prevent cell damage. It is super nourishing and moisturizing and because of it's healing agents works perfectly to repair damaged cuticles and skin and helps to prevent future damage. Studies have also shown that Vitamin E can help repair and reduce the effects of aging on the skin, so that's a bonus! 

Cuticle Oil

The last thing I use every time I give myself a full manicure and occasionally before I go to bed is Avon Moisture Therapy Hand Cream for extra dry skin. With this hand cream, a little goes a long way! It is probably the most moisturizing lotion for your hands that I have ever used! It can be a bit greasy, if you use too much, so I would start with a pea sized amount and if you find that you need more go from there. On an everyday basis, I use some other scented lotion that I have on hand. Currently that would be Bath & Body Works Japanese Cherry Blossom, which is my favorite scent ever! It works to moisturize, but the Avon Moisture Therapy, works much better when my hands and cuticles are in need of a major moisture boost! 

Hand Lotion

I don't use these products on a daily basis, but when I do, they really work well for me. I highly recommend them all if you are looking to give your cuticles and hands some tlc! 

Sunday, March 18, 2012

Luck O' The Irish

I hope everyone is feeling the luck o' the Irish today and having a Happy day after St. Patrick's Day!! Being the good Irish girl that I am, I had to do something festive for the holiday! So all week I've been wearing Sally Hansen's Xtreme Wear in Going Green. It is probably my favorite green nail polish, only because it is a true green with a subtle shimmer to it. I've worn it for the last two years for St. Patrick's Day, so I figured it's kind of a tradition now. I should really wear it more often than I do, because it's definitely one of my favorites, but for some reason I only break it out for the holiday. I also got a little festive with my eye shadow. I did a green and gold look using the e.l.f. Silver Studio Box 100 palette. It was a limited edition palette sold during the holidays for $10.00. I think it is still available on the e.l.f website. I love this palette, it definitely gets a lot of use; and for the price, the quality and pigmentation of the colors is really great! To do this eye look I used my eye shadow brushes from Eco Tools. Here are some pictures and I will list all the products I used below them.

Eye Shadow Look 1 

Eye Shadow
Sally Hansen Going Green
e.l.f  Eye Shadow Palette 
On my eyes I used Urban Decay Primer Potion; NYX Jumbo Eye Pencil in Slate as a base color; on the lid is the third green from the bottom in the third column, I used the the second gold down in the second column(which is much golder than the picture shows) in my crease, I also applied that same gold to the center of my lid and underneath my bottom lash line, I applied a mix of the bottom two green shades in the third column on the outer corner of my eye, I used the third color down in the first column on my brow bone and on my inner corner(I used that one because it's a cream color with a subtle golden undertone); NYX eye liner pencil in black; Cover Girl's Lash Blast Volume Mascara in Black; and Cover Girl's Fresh Complexion Under Eye Concealer in Creamy Natural.

I hope everyone had a fun and safe St. Patrick's Day! 
"For each petal on the shamrock, this brings a wish your way. Good health, good luck, and happiness for today and everyday."

Tuesday, March 13, 2012

How do You Duo?

How do you duo today? Do you like purple nail polishes? How about blue? Want them both in one nail polish? Then you need to get Sally Hansen's Xtreme Wear in Virtual Violet, because it is virtually amazing! If you like Duo-chrome polishes, then this is a must! It is a violet/blue duo-chrome polish, with subtle undertones of pink. When you see the purple it is such a pretty vibrant violet color and when you see the blue it is sort of a shimmery silvery blue color. The subtle pink undertone that it gives off, really makes the purple pop! It does apply sheer and I needed three coats to get the opacity I was looking for.  Two coats is ok, but I recommend taking the time to apply the third coat! It is so vibrant and pretty with that extra coat! As a top coat, I applied Sally Hansen's Insta Dry in Clearly Quick.

This picture came out so nice! I love that it shows the pink undertones with the violet!

This shot really shows how pretty the polish looks when the light hits it and you see violet!

I love how this one shows of the silvery look of the blue when the light hits it a certain way!
Just in case I haven't said it already, the Xtreme Wear nail polish by Sally Hansen is amazing! These polishes last about a week before they start to chip and they are so pretty. I haven't found a color that I don't like yet and I have been using this line forever! 

Wednesday, February 15, 2012

Spring Is In the Air

Spring is in the air! Well, maybe not so much. It is only February after all. How do I help myself beat the winter blues? With nail polish of course! I've never been a stickler for beauty rules, and by that I mean I almost never follow the color rules. You know dark colors in the winter, jeweled tones and dark colors for fall, light and pastel for spring, and as bright as you can get for the summer. I just wear what I want when I want because it makes me happy! As much as I love the winter, February hits and I start to find it dreary. It's a total downer and I like to think that I am a generally upbeat person. Since I have to wear a uniform to work, there isn't much I can do to boost my mood in the wardrobe department, but I can paint my nails for that little bit of color I crave. So when I start to feel those winter blues, the dark polishes get shelved and the fun colors come out! It's proven that bright or pastel colors almost always lift your mood. Around this time of year I like to remind myself that spring is just around the corner. Two colors that are perfect for that are Sally Hansen's Xtreme Wear in Mint Sorbet and Sally Hansen's Xtreme Wear in Lacey Lilac. They are beautiful! The Mint Sorbet is this really pretty mint green color, almost a sea foam green, but a little brighter. The Lacey Lilac, is this gorgeous pastel purple. They kind of remind me of Easter eggs.They have a creme finish and you will probably need two coats, well I did at least. As a top coat I like to use Sally Hansen's Insta Dry in Clearly Quick to give it the glossy effect that I love! Here are pictures of what each one looks like!

Sally Hansen Mint Sorbet Swatch

Sally Hansen Lacey Lilac Swatch
See I told you they look like Easter egg colors! Easter eggs are perfect little reminders that spring is here and summer is not too far behind! Now if these colors aren't enough to boost your mood and you just need something more, go for a really bright summer color, like a hot pink or an orange, maybe even a yellow, if you're brave enough! Trust me it works!! :) Happy painting!

Saturday, January 28, 2012

Sparkle and Shine

Want to add a little sparkle and shine to your manicure? Keep reading! OK, so I kind of have this problem. I can't go into a store that sells nail polish and not buy at least one new bottle. I love nail polish! I have a fine arts degree, which introduced me to this amazing world of color. So when I see nail polish, for me it's like looking at the color wheel and seeing an infinite array of beautiful colors and different ways to combine them. The possibilities are endless! I kind of have the same problem when it comes to makeup. I see a color I love and I have to have it! Now don't get me wrong, makeup and nail polish can get expensive, so I tend to stick to drug store brands that are affordable and allow me to get my fix, so to speak. Anyway, I'm rambling, the point of this little blog today is in fact nail polish, specifically Sally Hansen Hard as Nails Ice Queen. It is beautiful! It's a glitter polish that is so sparkly and shimmery! It is a super fine silver glitter base mixed with fine green, red, and yellow glitter and chunkier flecks of blue and purple. I wore it over Cover Girls Midnight Magic, which is a really deep navy blue shade. However, I think it would look perfect with any darker shade. I really would like to try it with Sinful Colors Last Chance, a really pretty emerald color, or Sally Hansen's Xtreme Wear in Gunmetal, a rich grey shade. It would also look lovely on it's own, you made need to put on a few coats though for full opacity. I'm not sure what else to say about it, except that it really is pretty! I'll let the pictures do the talking for me!


Finished Manicure

Close Up Of Manicure

Sally Hansen Ice Queen, Cover Girl Midnight Magic
What's your favorite glitter polish? If there is a drug store brand nail polish that you would like to hear about, leave it the comments and if I have it I'll review it for you, if I don't I'll try to find it!